Burnt caramel Mini Egg millionaire’s shortbread

I came across a version of this recipe online and adapted it slightly to give a slightly burnt caramel toffee in the middle rather than the plain caramel one in the original.

Although there’s no real eggs in it, I thought, as it’s nearly Easter, Mini Eggs would do as a substitute this time around!

You’ll need a square baking tin, lined in greased foil.


Ingredients:

For the base

150 g unsalted butter

75 g caster sugar

200 g plain flour, sieved


For the caramel

150 ml double cream

100 g light muscovado sugar

30 g unsalted butter

Sea salt, to taste


For the chocolate topping

120 g Mini Eggs

200 g milk chocolate


  1. Preheat the oven to 170ºC (fan) and prepare your tin.
  2. Place the butter, sugar and flour in a food processor and blitz until it all comes together to form a soft dough.
  3. Press the dough into the base of the tin, trying to make it as even as possible. I just used my hands for this.
  4. Bake for 20–25 mins, until golden brown on top. Remove from the oven and leave to cool completely.
  5. To make the caramel, place all the ingredients except the salt in a medium-sized saucepan and heat gently until the butter has melted and the sugar dissolved. Increase the heat slightly and bring the mixture to the boil. Stirring continuously, simmer for at least 5 minutes, until the mixture starts to thicken and turns a slightly darker shade of brown. Add the salt to your taste.
  6. Pour the caramel over the cooled biscuit base and place in the fridge to cool for about 20 mins.
  7. Using a rolling pin, crush about 90 g (one pack) of Mini Eggs while still in the unopened packet. Scatter over the top of the caramel.
  8. Melt the chocolate in the microwave or in a glass bowl set over a pan of boiling water, taking care that the water doesn’t touch the bottom of the bowl. Pour over the top of the caramel and Mini Eggs, and then scatter the remaining eggs (some can be crushed or you can leave them whole) over the top of the chocolate.
  9. Leave to set before cutting. Twenty minutes in the fridge will do it.

Malty chocolate slab cake

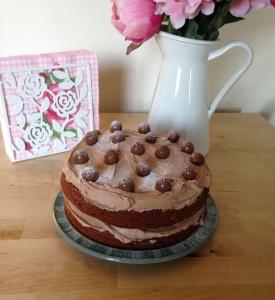
Yes, I am aware, another malty chocolate concoction! However, I think this is the easiest, and possibly the best, yet. This may trump my earlier recipes (although the Malteser muffins are still ace). This latest effort started off by me ripping out a recipe from a magazine I was reading at the hairdresser. I was halfway through making it when I realised I only had half the recipe! After fruitless attempts to find the original online, I had to just wing it, and I’m pleased to say, it turned out fab! Although the original recipe stated 100 g milk chocolate for the cake covering, that definitely wasn’t enough, so I’ve doubled the quantities accordingly. I also like that there’s no icing sugar in the topping.

I baked this in a rectangular tin that was about 30 x 20 cm. Anything roughly that shape and size will do, although if you go for a smaller but deeper tin you will need to adjust the baking time accordingly. Remember to grease and line your tin with baking paper.

Ingredients:

For the sponge
60 g Horlicks or Ovaltine

50 g cocoa powder

225 ml milk

175 g unsalted butter, at room temperature

125 g caster sugar

125 g light brown muscovado sugar

3 medium-sized free-range eggs, beaten with a fork

185 g self-raising flour

For the topping

200 g milk chocolate

40 g unsalted butter, at room temperature

Medium-sized bag of Maltesers

Instructions

  1. Put the Horlicks/Ovaltine and the cocoa powder in a non-stick, medium-sized pan and stir in the milk with a wooden spoon until combined. Set the pan over a very low heat and stir continuously until the mixture comes to the boil and thickens slightly (this took about 20 mins when I did it).
  2. Remove the pan from the heat and leave to cool until barely warm (about 30 mins). At this point you can start preheating your oven to 170ºC fan.
  3. Next, beat together the butter and the sugars until light and fluffy. I use an electric K-mix for beating but any hand-mixer will do.
  4. Gradually add the eggs to the mixture (I did four additions), scraping down the sides of the bowl now and again to ensure the mixture is well combined.
  5. Sift half the flour into the bowl and beat until combined. Now add half of the chocolate/milk mixture and beat until combined. Finish by adding the rest of the flour, beating until combined, and finishing with the second lot of the chocolate mix.
  6. Pour the cake mixture into the tin, levelling it off if necessary and ensuring the mixture reaches all the corners of the tin.
  7. Bake for 25 mins. The cake is ready when a skewer inserted into the middle of it comes out clean. Leave the cake to cool in the tin for a few minutes, before turning it out onto a wire rack to cool completely before adding the topping.
  8. To make the chocolate topping, melt the milk chocolate in a bowl set over a pan of simmering water, ensuring the water does not touch the bottom of the bowl. When the chocolate has melted beat in the butter until the mixture thickens a bit. Spread over the cake and then add some Maltesers for decoration. I just left mine whole but you could crush them and scatter them all over the top if you wished.

Chocolate cheesecake muffins

These are contenders for my favourite ever cupcakes. A mix of a chocolate muffin mix and vanilla cheesecake, these are melt in the mouth. Just as tasty with or without the icing. Oh, and don’t despair. The mixtures for both look a bit odd, but just roll with it – they’ll turn out perfectly.

You’ll need one 12-hole muffin tin, lined with paper cases.

IMG_1245

Ingredients:

For the muffin mix

190 g plain flour

120 g caster sugar

40 g cocoa powder

1/2 tsp bicarbonate of soda

125 ml water

40 ml sunflower/vegetable/rapeseed oil

1 1/2 tsp white wine vinegar

1/2 tsp vanilla extract

For the cheesecake mix

140 g Philadelphia cream cheese (full fat)

60 g caster sugar

1 egg (free range, of course!)

1/2 tsp vanilla extract

Pinch of salt

100 g milk chocolate chips

Instructions

1. Preheat the oven to 170ºC fan.

2. Start by making the chocolate muffin mix. Sieve the flour, sugar, cocoa powder and bicarbonate into a large bowl.

3. Put the water, oil, vinegar and vanilla extract into a jug, whisking with a fork to combine. With an electric whisk to hand, start pouring the wet ingredients into the dry ingredients, mixing continuously with the whisk, increasing the speed as the mixture thickens. Once well mixed, spoon the muffin mixture into the paper cases. There should be enough mixture to get the cases two-thirds full.

4. Next, make the cheesecake mix. Beat together the Philadelphia cheese, sugar, egg, vanilla extract and salt on a medium speed until smooth. I used my K-mix electric mixer for this but a handheld electric whisk could also be used. Using a wooden spoon, stir the in the chocolate chips.

5. Spoon the cheesecake mixture over the top of the muffin mixture in the cases.

6. Bake in the oven for 20 mins. The cheesecake on the top should be a light golden colour. It’s important not to overbake as the mixture will become very dry. Leave to cool for a while in the tins before transferring to a wire rack to cool completely.

7. When cold, you may wish to add some icing. A recipe for a cream cheese topping is given below. Top the cakes with the icing and then dust with cocoa powder for some added razzle dazzle.

Cream cheese topping

Sift 300 g icing sugar into a bowl and add 50 g softened unsalted butter. Beat together until the mixture combines a bit. Then add 125 g cold Philadelphia cheese and beat the mixture for 5 mins at a high speed to get it nice and fluffy.

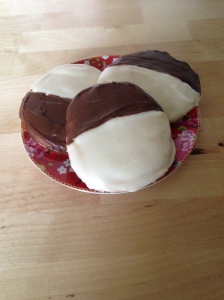
NY Black and White Cookies

Is it a cookie or a cake? This Manhattan classic is sure to reignite the infamous Jaffa Cake debate among British readers of the blog! Whatever you think it is, it’s delicious. Maybe not quite up to the standard of the one I got from Pasticceria Rocco on Bleecker Street in the West Village (check out how delicious their ones look on their website), but they’re a damn fine attempt! Just take your time making the icing nice and neat for maximum impact.

A bit of a strange baking method…I was very unsure that they would turn out well but I needn’t have worried. They were fantastic and went down a treat. I will definitely be making these again!

Also, these cookies are designed to be big (you wouldn’t expect anything less of an American-inspired treat now, would you?), so don’t scrimp when measuring out your mix before baking. These quantities will make about 20 large cookies.

NY black and white cookie

NY black and white cookies

Ingredients:

For the cookies

540 g plain flour

1/2 tsp baking powder

1/2 tsp salt

220 g unsalted butter (at room temperature)

370 g caster sugar

2 large eggs (free range, of course!)

1/2 tsp vanilla extract

1/2 tsp concentrated lemon juice

230 ml milk

For the glaze

60 g dark chocolate

80 ml water

1/2 tsp vanilla extract

60 g golden syrup

620 g icing sugar, sifted

Instructions

1. Preheat your oven to 170ºC fan and line a few baking trays with non-stick baking paper (I needed four trays).

2. Sift together the flour, baking powder and salt into a bowl and set aside.

3. Beat together the butter and the caster sugar until light and fluffy (at least 2–3 mins), scraping down the sides of the bowl to ensure a good consistency. I use a K-mix but any electric mixer will work fine.

4. Add the eggs one at a time, mixing well after each addition. Then, add the vanilla extract and lemon juice, mixing until just incorporated, and scraping down the sides of the bowl as necessary. Add the flour mixture, alternating with the milk, in three additions. Beat only until just mixed – don’t overmix but ensure it’s evenly mixed. The ‘dough’ should still be quite wet – it shouldn’t be as thick as a normal cookie dough mix. Don’t panic, though, this is how it should be (like a thick cake mix).

5. Spoon out the mixture onto the prepared baking trays. About 2 tbsp of dough per cookie is about right and ensure they are adequately spaced on the sheets (no more than six per sheet). Wet your fingers with water and press down the heaps of dough into flattish circles (you’ll never get them 100% circular unless you use a mould but I didn’t bother). Bake them for 15 mins until light golden brown. Cool them for a while on the sheets before transferring to wire racks to cool completely.

6. While the cookies are cooling, make the topping. First, melt the dark chocolate (either in the microwave using 20-second blasts until it is just melted, or by placing it in a glass bowl set over a pan of simmering water, ensuring the water doesn’t touch the bottom of the bowl). Set aside.

7. In a medium-sized pan over a medium heat, bring the water, vanilla extract and syrup to a boil. Remove from the heat and briskly whisk in the icing sugar. Transfer about 170 g of this icing to the bowl with the melted chocolate and whisk together until smooth and quite thick.

8. Using a small palette knife spread the vanilla icing onto half of each of the cookies, repeating with the chocolate icing on the other half. Take the time to ensure a ‘clean’ line as this will enhance the look of your end product.*

9. Leave to set before serving (about 1 h).

*NB, if your icing becomes too thick while you are working, loosen it by adding about 1/2 tsp warm water at a time if you need to.

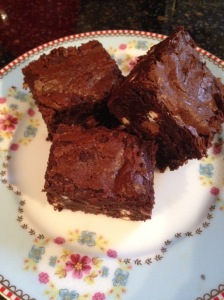
Triple chocolate brownies

As mentioned in my last post (chocolate chip cookies), I have been craving chocolate lately so today’s attempt was triple chocolate brownies, as an ordinary brownie wasn’t going to cut it. I’ve got quite a few good recipes for brownies but this was my first attempt at a three-chocolate variety. They are just out of the oven and certainly smell the biz…

You’ll need a 23 x 23 cm square baking tin lined with greased foil.

Triple chocolate brownies

Triple chocolate brownies

Ingredients:

185 g unsalted butter, cubed

1 vanilla pod (if you don’t have one to hand, just use about a tsp of vanilla extract)

180 g dark chocolate, roughly chopped to aid melting

2 large eggs (free range, of course)

2 egg yolks (free range, too!)

250 g caster sugar

150 g plain flour

50 g cocoa powder

75 g white chocolate chips

75 g milk chocolate

Instructions

1. Preheat your oven to 170ºC fan and prepare your baking tin. If using a vanilla pod, take a sharp knife and split it down the middle. Scrape out the seeds using the tip of the knife and set aside.

2. Next, place the dark chocolate in a glass bowl along with the butter and set it over a pan of barely simmering water, ensuring the bottom of the bowl isn’t touching the water. Leave to melt, stirring occasionally.

3. While the chocolate is busy melting, use an electric mixer to beat together the eggs, egg yolks, sugar and vanilla until smooth and creamy. This will take about 3 minutes at a low–medium speed.

4. In a separate bowl, sift together the flour and cocoa powder.

5. By this time the chocolate mixture should have finished melting so remove it from the heat and leave it to cool for 2–3 minutes. Once cooled slightly, add the chocolate mixture to the egg mixture and beat until just incorporated. Fold in the sifted flour/cocoa powder using a wooden spoon. Finally, stir in the chocolate chips.

6. Pour the mixture into the baking tin and bake for 25 minutes. Remove from the oven and leave to cool completely in the tin.

Chocolate chip cookies

I have been craving chocolate like mad for the last couple of weeks, so the next few recipes will feature chocolate heavily! Not for the faint hearted, these cookies have a slightly more ‘cakey’ texture than other cookies I make but they hit the mark. I used half milk chocolate chips and half white chocolate chips but if you prefer one over the other just make up the weight with your favourite (all white might be quite good…).

Makes 24 decent sized biscuits. You’ll need four baking sheets/trays lined with greaseproof or baking paper.

Ingredients:

200 g unsalted butter, at room temperature

250 g light soft brown sugar

1 large egg (free range, of course!)

1 tsp vanilla extract

150 g dark chocolate

320 g plain flour

1 tsp bicarbonate of soda

1/4 tsp baking powder

150 g milk chocolate chips

150 g white chocolate chips

Instructions

1. Preheat your oven to 170ºC fan and get your baking trays prepared.

2. Using an electric mixer (I use a K-mix but a hand-held mixer will work fine), cream the butter and sugar together until light and fluffy.

3. Add the egg and the vanilla, and mix until combined.

4. Sift the flour, bicarbonate of soda and baking powder together in a separate bowl. Add to the butter mixture in two batches, mixing well in between. The mixture will form a soft dough. Fold in the chocolate chips with a wooden spoon.

5. Gather the mixture together by hand into a ball and wrap it in clingfilm. Place it in the fridge for 15 minutes. Remove from the fridge and divide it as best you can into equal-sized bits of dough (you should get 24 from this mixture). I just did this by eye and managed fine but you could always weigh each piece if you wanted to be extra professional!

6. Roll each piece into a ball and then flatten it with your hand so that each cookie is about 1 cm thick. Place six on a baking tray, ensuring they are evenly spaced (any more and they’ll spread and all stick together).

7. Bake in the oven for 10 minutes. You won’t be able to see them going golden because of their dark colour, but they should be slightly firm around the edge and a bit softer in the middle when they’re ready. Remove them from the oven and allow them to cool for a while on the trays before transferring them to wire racks to cool completely.

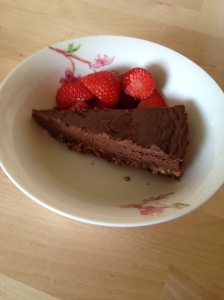
A healthier take on Mississippi mud pie

Those of you who know me well will know that I have got quite into fitness and lifting weights in particular. As a result of this, I have been following a high-protein diet but that doesn’t stop me having a sweet tooth. I found a version of this protein-lovers Mississippi mud pie on the side of a carton of Greek yoghurt. It’s quick, easy and hits the mark quite nicely. Perfect if you’re on a low-sugar or high-protein programme.

You’ll need an 8-inch non-stick loose-bottomed cake tin for this.

Ingredients:

250 g full-fat Greek yoghurt

200 g dark chocolate

100 g digestive biscuits (if you can get low-fat ones, go for it, but if not the ordinary ones will do)

75 g rough oatcakes

4 medium eggs (free range, of course)

2 tsp vanilla extract

4 tbsp agave syrup

Instructions
1. Heat your oven to 160ºC fan.

2. Melt 75 g of the dark chocolate in a glass bowl set over a pan of simmering water (ensuring the water doesn’t touch the base of the bowl).

3. Finely crush the biscuits and the oatcakes together. I used a food processor for this but you can also do it by putting the biscuits inside a plastic freezer bag, tying a knot and bashing the bag with a rolling pin.

4. Once the chocolate has melted, add the biscuit mixture and one of the eggs, and mix. Spoon the mixture into the tin, press down with the back of a spoon and place in the fridge for about 10 mins.

5. Meanwhile, melt the remaining chocolate and then leave it to cool for 5 mins.

6. Beat the three remaining eggs and then add to the melted chocolate along with 250 g of the Greek yoghurt, vanilla extract and the agave syrup. Mix well. Spoon it on top of your cooled base and smooth the surface. Bake for 25 mins until just set and a wee bit wobbly in the middle. Cool at room temperature and then place in the fridge for at least 2 hours.

IMG_0576

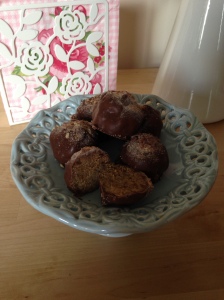
Malty cake balls

Naughty but nice, these small treats could easily be stuck on lollipop sticks and served as cake pops. As I made them just for fun and not for any particular occasion, I didn’t bother with such fancy and just dished them up on a plate.

The recipe may seem a bit odd, and at various points you may think it’s all gone horribly wrong, but I promise it hasn’t and they will taste great. Just go with it!

Malty chocolate balls

Malty chocolate balls

Ingredients:

For the sponge

190 g self-raising flour

1 tsp baking powder

1/2 tsp bicarbonate of soda

1/4 tsp salt

65 g Horlicks or Ovaltine

55 g unsalted butter, at room temperature

60 ml sour cream

100 g caster sugar

100 g soft dark brown sugar

2 large egg whites (free range, of course!)

For the buttercream

60 g unsalted butter, at room temperature

100 g icing sugar, sifted

1 tbsp Horlicks or Ovaltine

1/4 tsp vanilla extract

For the decoration

300 g milk chocolate

50 g crushed Maltesers

Instructions

1. Preheat your oven to 170ºC fan, and lightly grease and flour a 20-cm square baking tin (or similar sized round one).

2. Cream the butter and sour cream, and then add the sugars and cream the mixture until light and fluffy. I use a K-mix but a handheld electric mixer will do the job.

3. Sift together flour, baking powder, bicarbonate of soda, salt and Horlicks/Ovaltine in a separate bowl and then add into the butter/sugar mixture in two batches.

4. Whisk the egg whites in a clean bowl until frothy and then fold into the cake mixture. Pour the mixture into the cake tin and bake for around 25 mins or until a skewer inserted into the middle of the cake comes out clean. Remove from the oven and leave in tin to cool for around 5 mins before turning out onto a wire rack.

5. While the cake is cooling, make the buttercream. Cream  the butter and icing sugar together into a bowl. Gradually add the Horlicks/Ovaltine and continue to cream until light and fluffy. Finally, add the vanilla.

6. Once the cake has cooled, crumble it by hand into a large bowl (yes, really!). Add the buttercream and to bind the mixture, and shape it into a big ball (should look a bit like a lump of pastry). Leaving the cake mixture in the bowl, cover the bowl with cling film and place it in the fridge for about an hour.

7. After the mixture has been in the fridge for an hour, remove it and roll 20 equally sized balls from the mixture, using your hands. They don’t have to be perfect! Line a baking tray or sheet with baking paper and place the balls on it. Cover them with cling film and put back in the fridge for about 20 mins.

8. Once the cake balls are out of the fridge for the second time, melt the chocolate. I like doing it the traditional way in a glass bowl set over a pan with a little simmering water in it. Just make sure the bottom of the bowl doesn’t touch the water. Using a fork and a spoon, dip each ball into the melted chocolate and cover completely. Gently shake the ball over the bowl to remove any excess chocolate. Place the ball back on the baking sheet and scatter over some of the crushed Maltesers. Leave to set on the baking sheet before serving.

Double chocolate cheesecake

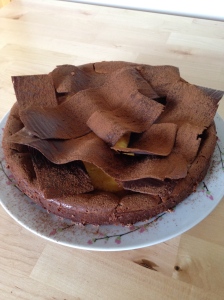
This is a bit of a showstopper cheesecake, with the chocolate ribbons on top. Although the ribbons look fancy, they are actually really easy to make, so don’t be put off. Goes well with vanilla custard, ice cream or just plain ol’ whipped cream. The base, which I particularly enjoyed, could easily be made for any other type of cheesecake as a replacement for the traditional digestive-based bottom (which I don’t especially like).

Double chocolate ribbon cheesecake

Double chocolate ribbon cheesecake

Ingredients:

For the base

40 g butter

2 level tsp cocoa

125 g shortbread biscuits

75 g finely chopped dark chocolate

For the filling

400 g full-fat Philadelphia

125 g caster sugar

3 large eggs, beaten (free range, of course!)

142 ml double cream

125 g plain chocolate, melted and cooled slightly

125 g white chocolate, melted and cooled slightly

For the chocolate ribbon decorations

125 g plain chocolate

Cocoa powder, to decorate

Instructions

1. Line a 9-inch springform tin by wrapping foil round the base and clipping the tin in place.

2. To make the base, melt the butter in a pan, add the cocoa and cook for 30 seconds. Place the shortbread biscuits in a food processor and blitz until finely chopped. Stir in the butter mixture until evenly distributed, and spoon the mix into the tin, pressing down to given an even layer. Place in the fridge for 30 minutes. This is also a good time to turn on your oven to preheat (160ºC fan).

3. While the base is chilling, make the filling (see, it rhymes!). Beat together the cream cheese and caster sugar in a large bowl until smooth (don’t overmix). Gradually beat in the eggs and cream. Divide the mixture between two smaller bowls. Into one, stir the melted dark chocolate and into the other the melted white chocolate.

4. Once the base is chilled, remove it from the fridge and pour over the plain chocolate mixture, smoothing to make an even layer. Then, pour the white chocolate mixture over the top of the plain chocolate layer. Bake in the oven for 50 minutes. Turn the oven off and leave the cheesecake in it to cool. Once cool, transfer it to the fridge to chill for at least 3 hours (or overnight, if possible).

5. To decorate, make the chocolate ribbons by cutting 12 strips of non-stick baking paper. You can make them as thick or as thin as you like, but a rough measurement would be 30.5 cm x 3 cm. Line up three wooden spoons in a row, spacing the handles an even distance apart (this will create the waves).

6. Brush the melted chocolate thinly over the paper (the thicker the chocolate, the harder it will be to peel off the paper later without snapping the chocolate). Arrange the paper strips horizontally over the spoon handles, creating a ripple effect.

7. Once the chocolate has set, peel the paper off the back of the ribbons. It should come off very easily. Place them decoratively over the top of the cheesecake and dust generously with cocoa powder.

Chocolate malt cake

Does what it says on the tin. Super easy to make and delicious. What more do you need?

Chocolate malt cake

Chocolate malt cake

Ingredients:

For the sponge

30 g Horlicks powder

30 g cocoa powder

225 g butter, at room temperature

225 g caster sugar

225 g self-raising flour

1 tsp baking powder

4 eggs (free range, of course!)

For the icing

3 tbsp Horlicks powder

1 1/2 tbsp hot milk

125 g butter, at room temperature

250 g icing sugar, sifted

50 g dark chocolate, melted

1 tbsp boiling water

Maltesers, to decorate

Instructions

1. Grease and line two 20 cm (8 inch) round sandwich tins and preheat the oven to 160ºC fan.

2. Put the Horlicks and cocoa powder in a large bowl (if you are going to use an electric mixer, such as a K-mix, use this bowl), add 2 tbsp water and mix to form a paste. Add the remaining sponge ingredients and beat until smooth.

3. Divide the mixture equally between the two tins and bake for 25 minutes. Cool the sponges in the tins for about 5 minutes before transferring them to a wire rack to cool completely.

4. While the cakes are cooling, make the icing. Again, if using an electric mixer such as a K-mix, use the bowl that goes with this. First, add the Horlicks to the bowl and add the hot milk, mixing until smooth. Then, add the butter, icing sugar and melted chocolate, mixing until smooth. Finally, add the boiling water and mix again.

5. When the cakes are cool, place one upside down on a plate and cover it in about half of the icing. Place the other sponge on top (right side up) and cover in the remaining icing. Place some Maltesers on top and sprinkle with some icing sugar.

Taken from a Mary Berry recipe.